Downward Dog for Beginners: Form and Modifications
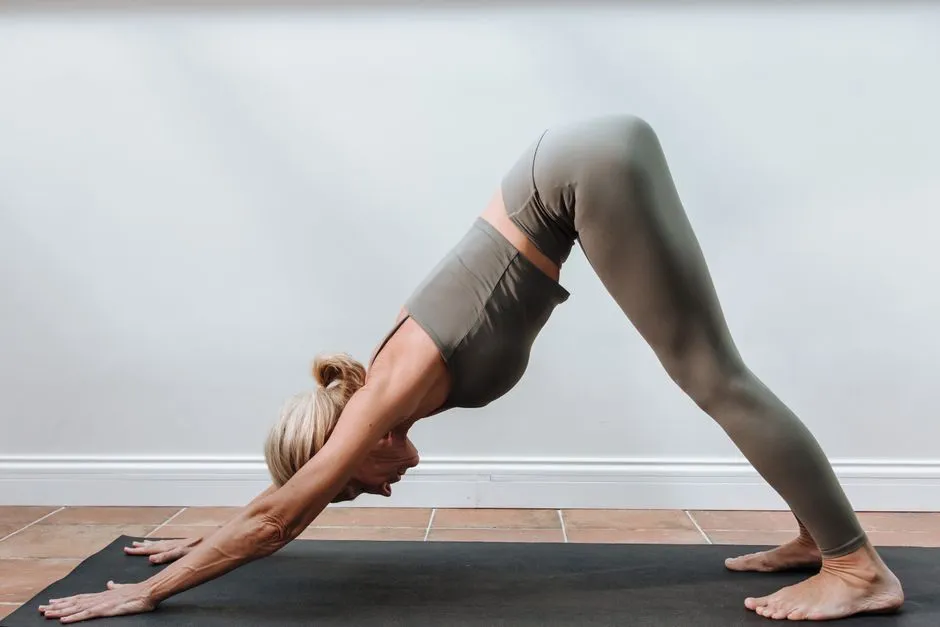
- Downward Dog is common, not compulsory
- Start on hands and knees
- Lift with the knees bent
- Keep the knees bent to organize the trunk
- Let the heels hover
- Organize the shoulders without one magic cue
- Decide how much weight belongs in the hands
- Try Downward Dog at a wall
- Use a sturdy chair for a middle height
- Stay on hands and knees
- Common problems and practical changes
- Enter and exit with control
Downward Dog is common, not compulsory
Downward-Facing Dog places hands and feet on the floor while the hips lift up and back, making an inverted V-ish shape. The “ish” matters. Bone proportions, ankle movement, hamstrings, shoulder capacity, and experience all change the silhouette. Bent knees and lifted heels are still Downward Dog.
The pose asks the arms and shoulders to carry load, the hands and feet to manage pressure, and the trunk to organize between them. Many beginners find it demanding. Calling it a resting pose does not make it one, any more than calling tax paperwork “light reading” lowers the pulse.
This guide teaches a floor version and lower-load alternatives. It is general education, not diagnosis, treatment, or rehabilitation. Yoga can cause injury. NCCIH advises appropriate instruction and modifications in its yoga safety guidance. Stop for sharp, sudden, escalating, or unfamiliar pain, numbness, dizziness, faintness, or breathing difficulty beyond normal exertion.
Start on hands and knees
Place a nonslip mat on a level floor. Come to hands and knees with hands roughly shoulder-width apart and knees roughly under hips. Spread the fingers comfortably, without forcing them into maximum span. Let the middle or index fingers point generally forward.
Press through the whole hand: the base of the index finger and thumb, outer palm, and heel of the hand. Not every point will feel equally loaded, but avoid dumping all pressure into the wrist crease while the finger pads float.
Keep the elbows straight enough to support you but not aggressively locked. Let the inner elbows face roughly toward each other rather than spinning fully forward. Broaden across the upper back by pressing the floor away.
If kneeling hurts, pad the knees for setup. If placing palms flat causes wrist pain, do not assume persistence will educate the joint. Use the wall or chair version below and seek individualized assessment if symptoms recur.
Lift with the knees bent
Tuck the toes. On an exhalation, lift the knees a few inches while keeping them deeply bent. Send the hips up and back. Imagine moving the pelvis away from the hands rather than immediately driving the heels down.
Keep the first version short. Take one or two breaths, lower the knees with control, and pause. Repeat. Several brief visits teach the pathway without waiting for the shoulders to write a resignation letter.
If you continue, adjust the stance one hand or foot at a time. A slightly longer stance can create room; too long may make it difficult to send weight back. A shorter stance may crowd the shoulders. There is no universal mat marking because limb proportions have declined to standardize.
Keep the knees bent to organize the trunk
Deeply bent knees allow the pelvis to tip and the trunk to lengthen without requiring maximum range from the backs of the legs. Think of the sit bones moving back and up while the lower ribs stay connected rather than flaring dramatically toward the floor.
The spine does not need to become perfectly straight. The useful question is whether you can create a long, supported trunk while breathing normally. If straightening the legs pulls the pelvis under, rounds the back substantially, or sends most weight forward, bend the knees again.
You may gradually straighten one leg and then the other, often called “walking the dog.” Keep it slow and exploratory. This alternation can reveal side-to-side differences, but it is not a treatment for tightness and it should not be pushed into pain.
Let the heels hover
Heels may move toward the floor, but they do not need to touch. Contact depends on ankle range, calf length, stance, proportions, and the rest of the pose. Forcing the heels down can shift strain into the feet, knees, hamstrings, back, or shoulders without improving the main action.
Keep the feet about hip-width or choose another stable width. Point the toes generally forward. Let the heels descend only as far as they naturally travel while the hips continue moving back.
If the heels are high, nothing has gone wrong. The floor is merely farther away today. It will cope.
Organize the shoulders without one magic cue
Press the hands down and forward into the mat while sending the hips back. These opposing directions can help lengthen the sides of the torso and reduce the feeling of collapsing onto the wrists.
Keep space between shoulders and ears, but do not yank the shoulder blades down the back. In an overhead arm position, the shoulder blades normally move around the rib cage. Think broad upper back and active arms rather than squeezing the blades together.
Rotate the upper arms only enough that the elbows point generally back rather than winging sharply outward. Bodies and shoulders vary. A cue that produces pinching, instability, or pain is not improved by being traditional.
The head hangs between the upper arms without being pushed toward the floor. Look toward the feet, knees, or mat. Keep the neck easy and avoid lifting the chin to inspect the room.
Decide how much weight belongs in the hands
Downward Dog always loads the upper body, but you can influence the distribution. Bend the knees and move the pelvis back. Press the hands firmly enough to maintain contact and keep the arms active. If the shoulders drift far beyond the wrists, the pose may feel more like Plank.
Do not chase a numerical weight split. No validated household percentage turns the pose safe. Sensation, control, symptom history, and instruction matter more than claiming exactly 40 percent of your soul is in each palm.
If hand pressure remains uncomfortable despite adjusting, leave the floor version. Wrist pain can have multiple causes, and an article cannot identify yours.
Try Downward Dog at a wall
Stand facing a wall, about one arm's length away. Place palms on the wall around shoulder height and shoulder-width apart. Walk the feet back while hinging at the hips until the arms and trunk make a long line roughly parallel to the floor.
Keep knees bent. Press the wall away and send the hips backward. Lengthen through the sides of the body without forcing the chest downward. Adjust hand height upward if shoulders feel crowded or lower only if the change remains comfortable.
This version reduces the amount of body weight borne through the hands and uses less wrist extension than palms on the floor. It teaches the same hand-forward, hips-back relationship. Stay for a few breaths, then walk forward before lowering the arms. Do not simply let go and surprise your balance.
Use a sturdy chair for a middle height
Place a sturdy, nonfolding chair against a wall on a nonslip floor, with the seat facing you. Put hands on the seat or, if the chair is designed and positioned safely, on the back. Step away and hinge at the hips.
Keep enough weight in the feet that the chair does not receive a dramatic horizontal shove. Bend the knees and send the hips back. The higher surface reduces wrist extension and upper-body load compared with the floor.
Do not use a rolling, swivelling, lightweight, damaged, or folding chair. Test it before practice. Furniture has boundaries too.
For more ways to choose stable support, see how to use yoga blocks, including why blocks are not automatically the best Downward Dog modification.
Stay on hands and knees
Table Pose can preserve much of the upper-body action without lifting the knees. Place hands and knees, press the floor away, and slide the hips slightly back while keeping the hands grounded. Return forward.
You can also hover the knees for one breath and lower. That is a different exercise, but it may help build familiarity with load in small doses. Skip the hover if it causes pain, loss of control, breath-holding, or pressure you cannot manage.
Child's Pose is sometimes offered as the alternative, but it is not comfortable for every knee, hip, or ankle. A neutral hands-and-knees position, seated rest, or standing rest is equally legitimate.
Common problems and practical changes
If your hands slide, check that the mat and hands are dry and clean. Shorten the hold. Do not compensate by gripping until the fingers cramp. A wall version removes the race between sweat and friction.
If shoulders crowd the ears, bend the knees, move the hips back, and press the floor away. If the crowding persists or becomes painful, lower and use more height.
If the lower back rounds, bend the knees more and prioritize the hip hinge. If the ribs sag and the back overarches, draw the lower ribs gently toward the body while maintaining length.
If hamstrings feel intensely stretched, bend the knees or use the wall. A broad, manageable sensation is enough. Sharp, electrical, burning, or escalating symptoms are not stretching goals.
If breathing becomes strained, leave the pose. Holding longer with worse organization is not endurance; it is just staying late.
Enter and exit with control
From the floor version, lower both knees rather than stepping forward if you are not ready for that transition. Pause on hands and knees, then sit or stand using support. From a wall or chair, walk the feet toward the support before standing upright.
Begin with two or three visits of one to three breaths. Rest between them. Add time only while hands remain grounded, shoulders supported, breathing easy, and the exit controlled.
Our beginner yoga routine deliberately leaves Downward Dog out, so you can practice basic movements before adding it. The household-prop restorative guide offers actual low-effort rests for days when inverted V-ish is not remotely restful.
The best beginner Downward Dog is not the one with the lowest heels. It is the one that teaches you something useful and still lets you lower the knees like you planned it.